In the software, click SHINE Center in the upper-right corner.
When the Connections panel opens, find Register this SHINE and click Register.
The registration page opens with this installation’s connection code already included. Choose the sign-in method you prefer—such as Apple or Google—and complete registration.
When the website confirms completion, return to the SHINE software and accept the connection.
Confirm that SHINE Center says Online before sending content.
You do not need to copy or request a code manually. The registration link carries the code for this specific installation, and it does not expose another organization’s library.
SHINE CENTEROff
SHINE CENTERConnections
×
Register once to connect the SHINE by Heaven app.
Register this SHINECreate one account for Mobile and WhatsApp + AI.Register
02
Library, folders and search
Organize everything with folders, drag and drop, search and practical filters.
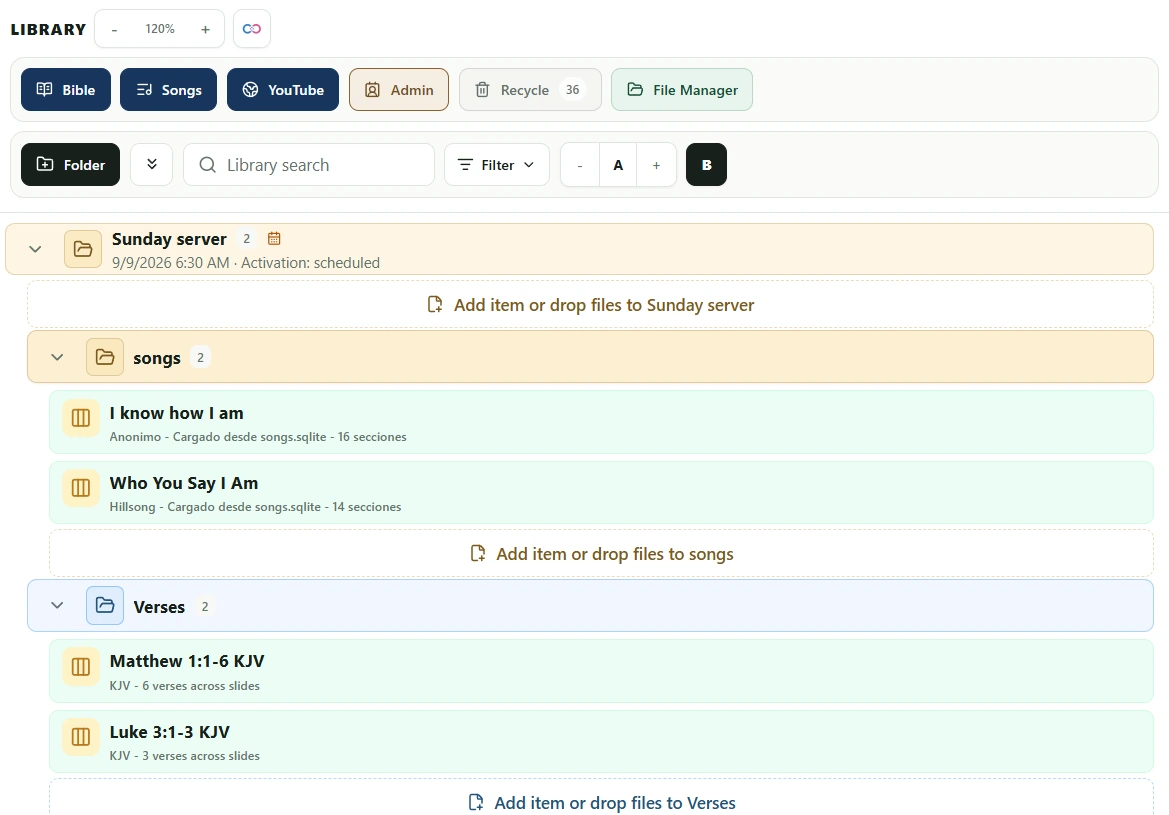
The toolbar controls how you find and view the Library. The folder tree controls how the service is organized.
1 · FolderCreate the folder required before adding content.
2 · Expand or collapseOpen or close all folders to keep a large Library ordered.
3 · SearchType any folder or item name to find it anywhere in the Library.
4 · FilterShow only the file or content types you need.
5 · Text sizeUse − and + to make Library labels smaller or larger.
6 · BoldToggle stronger Library labels; it does not change Live output.
How folders work
Click Folder, enter a name, choose its color and optionally set a date.
Lock a folder when it must remain protected from accidental deletion by another person.
Save exports the folder outside the desktop together with everything stored inside it.
Drag Bible passages or other SHINE content into the folder. For photos or supported desktop files, drop them into Add item or drop files, or click Add Item.
Folders can contain more folders. Create a parent folder for a service or event, then organize Songs, Verses or any structure inside it.
A folder must exist before content can be added to that location.
Library administration
AdminGrant authorized access to the shared organization Library.
RecycleRestore items removed by mistake or delete them permanently.
File ManagerReview downloaded, received or imported files and move them to the correct folder.
Color, date, lock and export organize the folder; they do not change what the audience sees in Live.
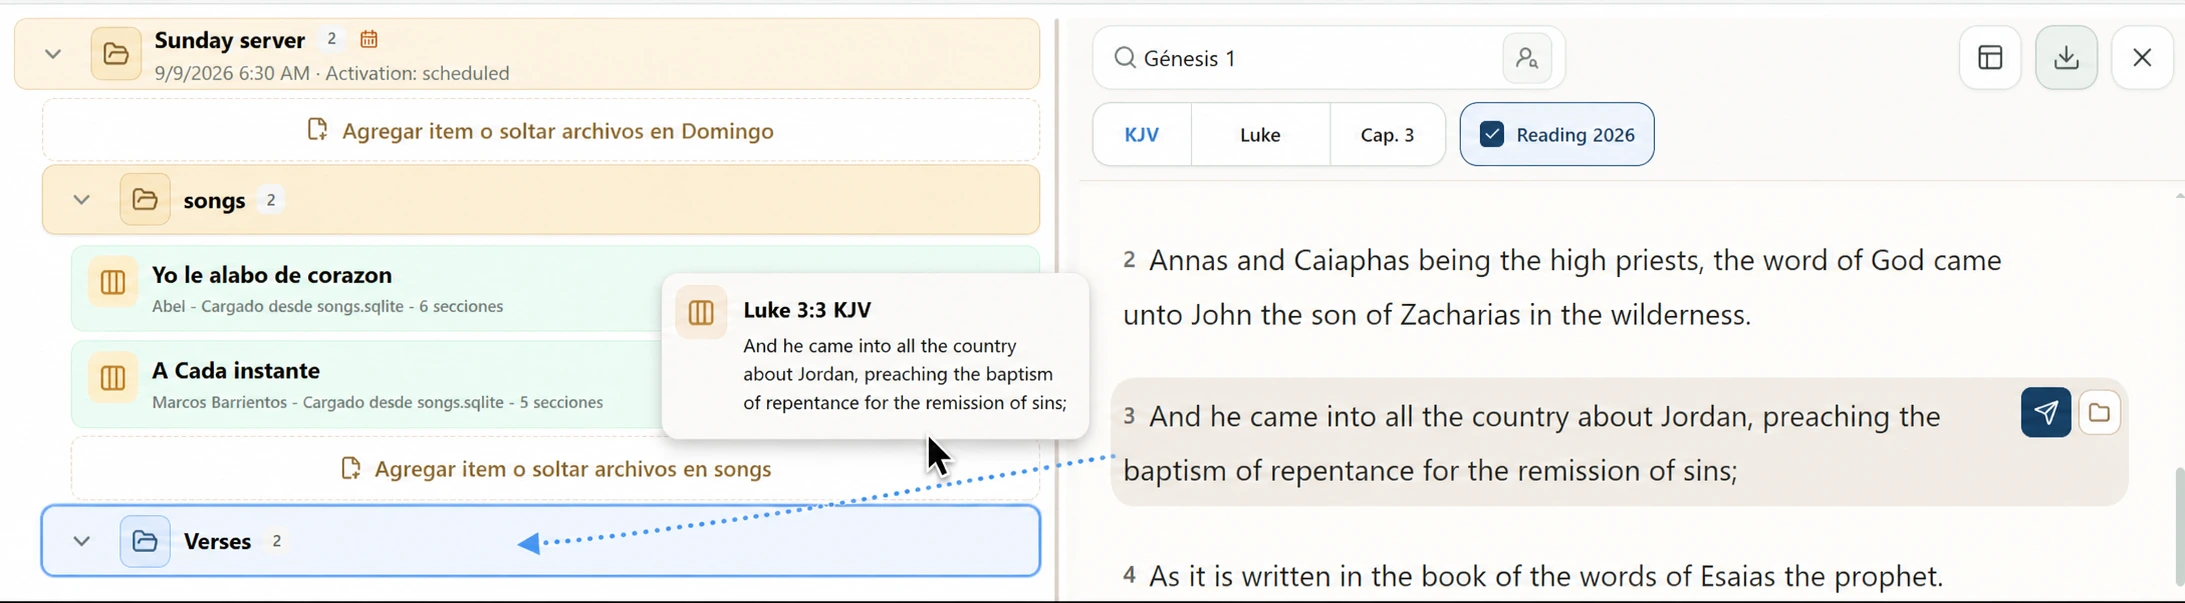
Drag the verse card from the Bible panel and release it when the destination folder is highlighted.03
Bible: find, prepare and send Scripture
Use one complete workspace for navigation, search, selection, folders and immediate Live sending.
Open Bible and navigate
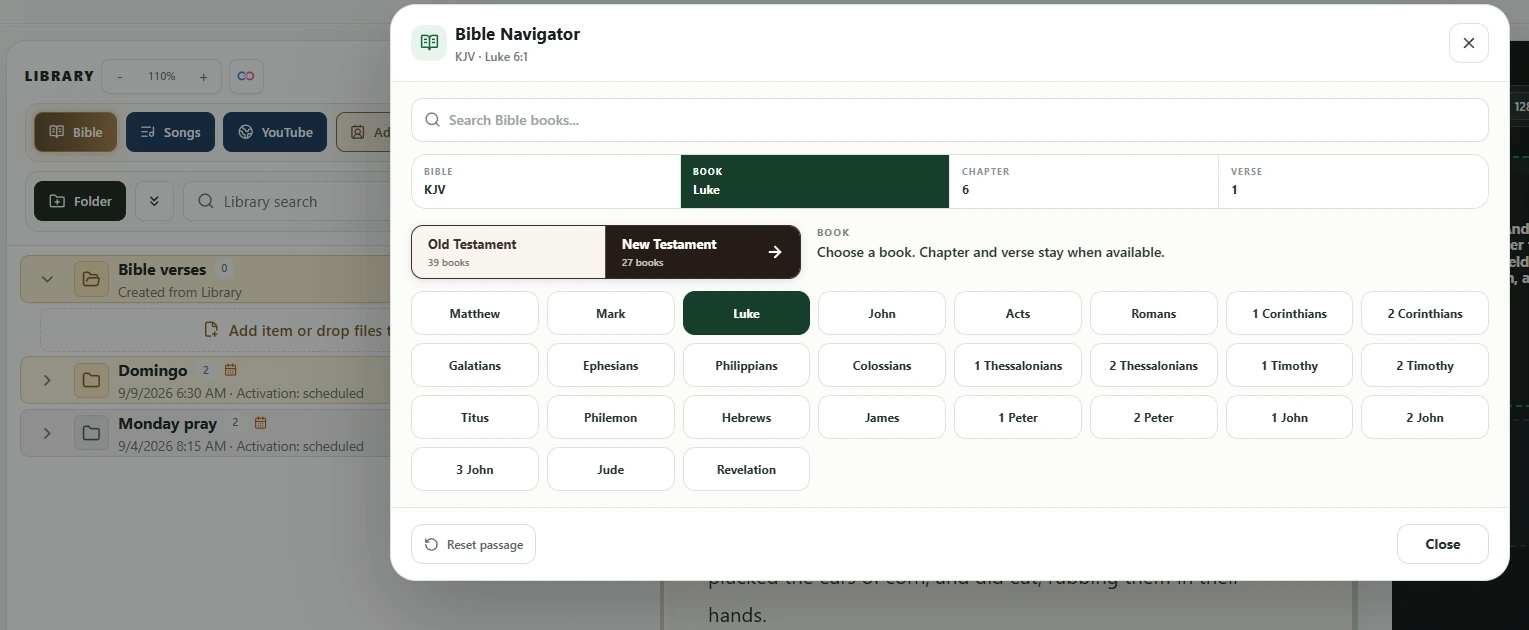
The warm yellow-brown Bible button means Bible is open in Split. Bible can also remain open while its button is blue because it is in Tab out mode; blue does not simply mean “open.” Use Bible Navigator to choose the Bible, testament, book, chapter and starting verse in one panel. Changing translation keeps the passage when it is available.
Bible Navigator keeps every passage control together.
Split, Full view and Pop out
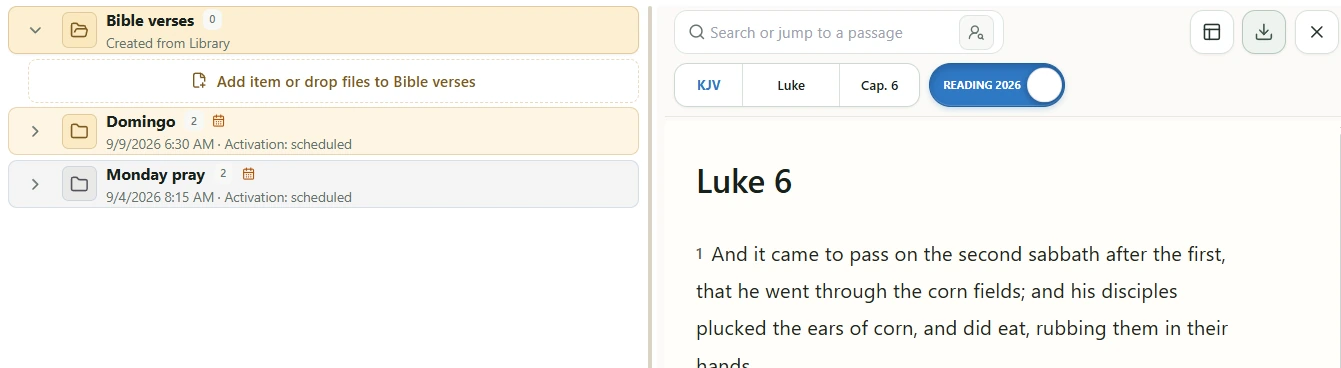
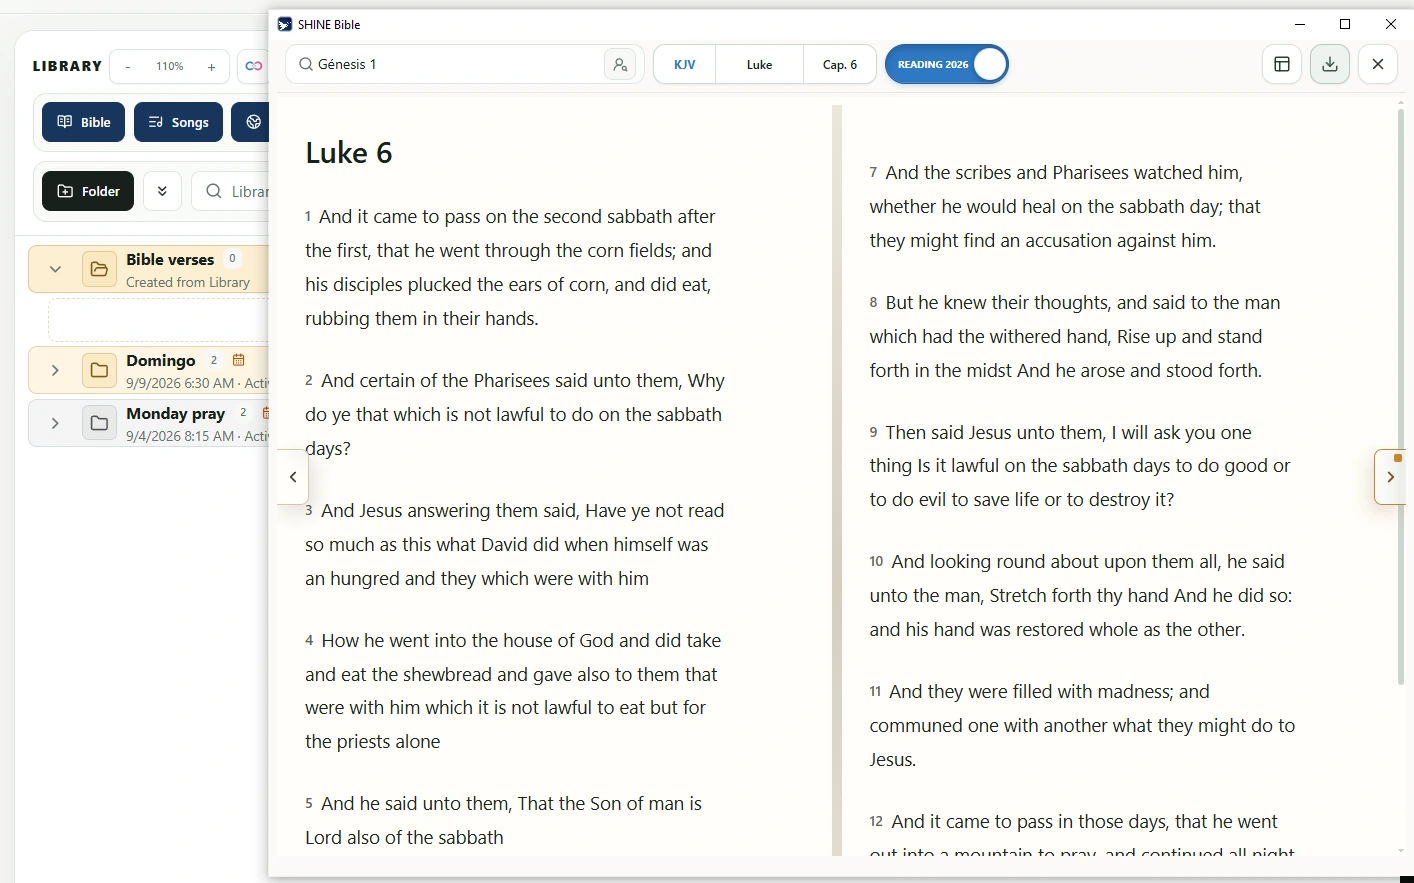
Split shares the workspace with Library. Full view gives the reader the complete SHINE workspace. Pop out opens a separate window so the main Library remains free for multitasking. The view button opens those exact options.
SplitPop out
Select, send or add to Library
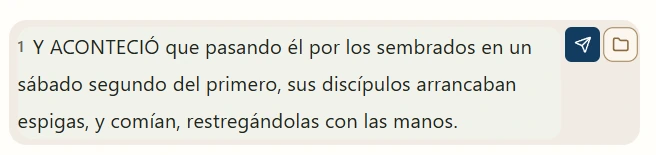
Click a verse to select it; consecutive verses can be selected together. The blue paper-plane sends directly to Live. The folder button adds the selection to a Library folder, and the same selection may also be dragged there. Oversized direct selections are limited so text is not forced into one unreadable screen; adding the passage to Library lets SHINE divide it into usable slides.
Paper-plane = Live now · Folder = add to Library
Reference search and people or places
The main field accepts flexible Bible references even when spacing or wording is not exact. Press the people-and-places icon to switch to its brown mode; enter at least three letters, such as John, to find matching verses across available Bibles.
Search or jump to a passage
Brown icon = people and places mode
Download or add a Bible
Press the download control to open Bible management. Install an available Bible or add a Bible file you obtained legitimately and have permission to use.
Download / manage Bibles
Quick Bible in Live
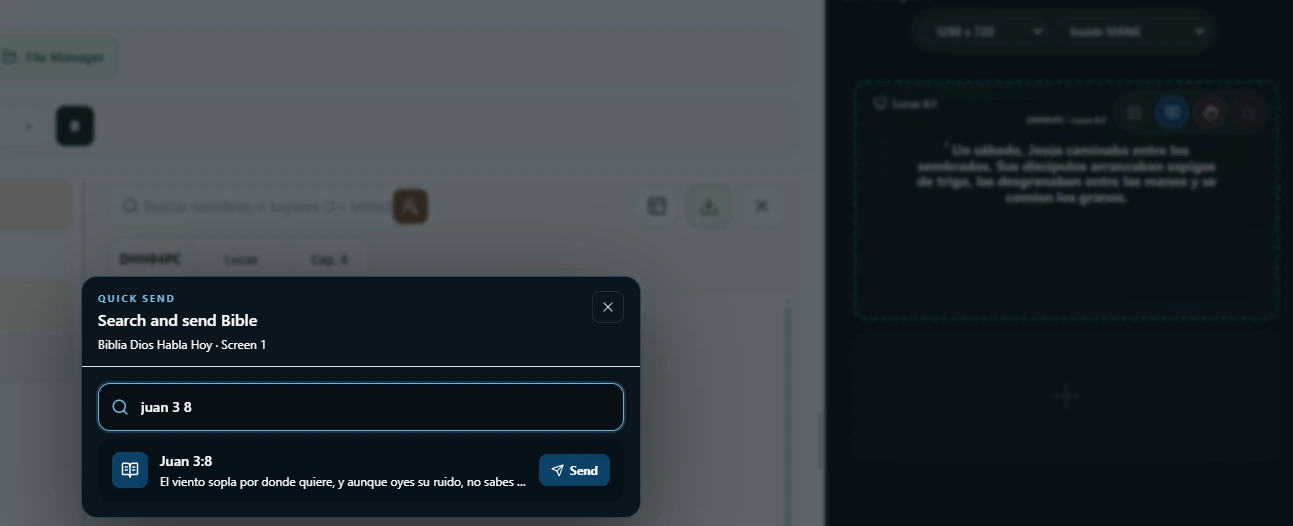
Press the blue outlined Bible icon in Live when a passage is needed immediately. Type the reference, review the match and press Enter or Send. It goes straight to the selected Live screen without first creating a Library item.
Quick BibleLocated on the Live side panel
This button opens the fast Quick Send menu shown here; it is different from opening the full Bible workspace.
Tap the blue Bible icon in Live, then search, confirm and send.
Choose the route by intent: paper-plane for the audience now, folder or drag-and-drop for later organization, and Quick Bible for an unplanned passage during Live.
04
Songs: find, add and organize lyrics
Open the Songs workspace, choose how to add a song and move it into the Library folder that needs it.
Open Songs, search and choose a view
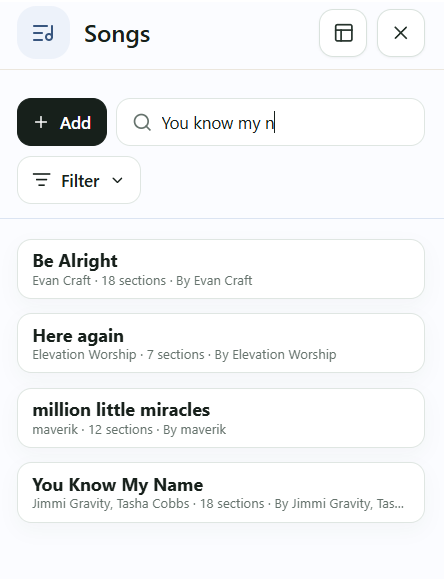
Press the blue Songs tab at the top of Library. The workspace can share the screen with Library in Split or open separately with Pop out. Search by title, use Filter to narrow the list, and select a result to reveal its Preview, Add and edit controls.
Songs
Add, search, Filter and view controls stay together inside Songs.
Add automatically or manually
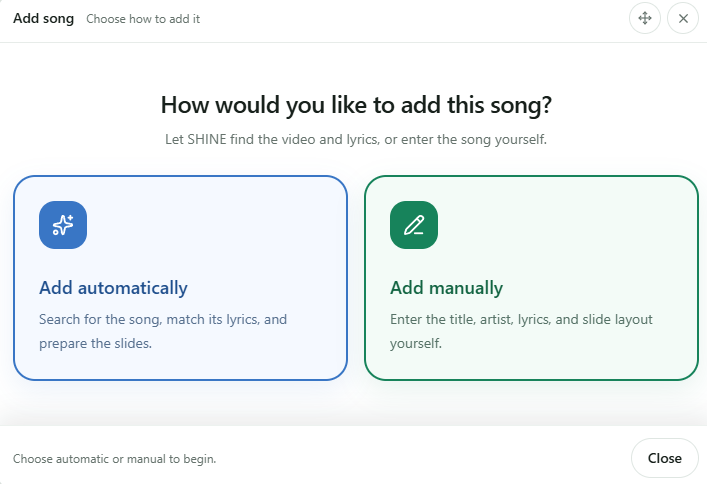
Add automatically lets SHINE search available open-source pages for a matching video and lyrics, then prepare the slides for review. If no reliable lyrics are found, choose Add manually and enter the title, artist, lyrics and slide layout yourself.
Always review the selected video, lyrics, sections and slide breaks before adding the song.
Choose the route that matches the material you have.
Add “Cristo yo te amo” to Library
After the song appears in Songs, drag its card toward the Library and release it inside the highlighted destination folder. You can also select the song and press + Add. A Library folder must exist before the song can be added.
Library
MusicDrop song here
Songs
yo te amo
Cristo yo te amoVino Nuevo · 5 sections
Cristo yo te amoVino Nuevo · 5 sections
05
Live Output and the four quick actions
Control what the audience sees without losing your working screen.
Choose resolution and destination screen
Before sending content, use the first selector above Live Output to choose the resolution the audience will see. Use the second selector to choose the display, projector or other output screen that should receive Live.
1280 × 720Inside SHINE
Left Audience resolution Right Destination display or projection
Send any item to Live
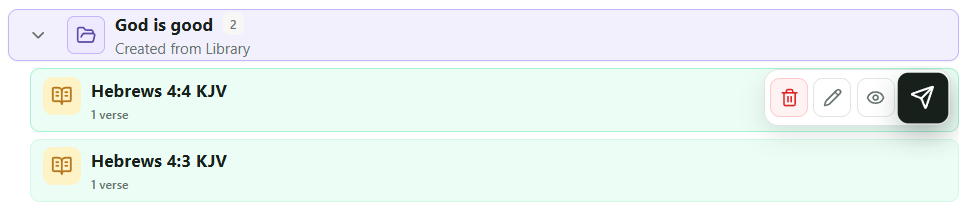
Hover over the verse, song, image or other item you want to show. The universal dark-blue Send icon appears. Press it and the item goes to Live immediately. Opening an item also places the same Send icon in its top toolbar.
Universal Send to Live
Open each step separately to inspect it at full size.
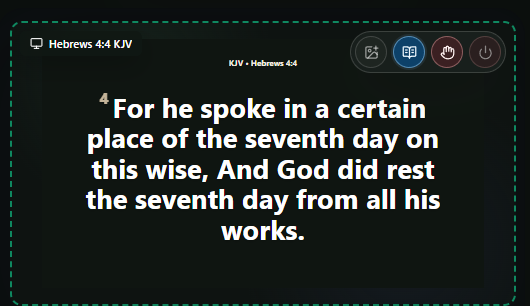
1 · Green: Send appearsHover over the item and press the dark-blue Send icon.2 · Content enters LiveThe selected verse appears immediately on the audience output.3 · Dark pink: sent and on airThe item changes to dark pink; LIVE identifies the item currently displayed.
Change text size directly in Live
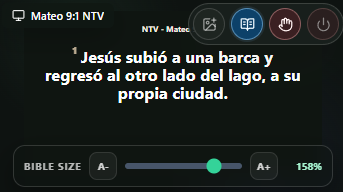
Move the mouse to the bottom edge of Live Output to reveal the size bar. Use A−, the slider or A+ to make the Bible or song text currently on Live smaller or larger. The percentage shows the active scale.
This is a live adjustment: the audience sees the text change immediately; it is not only a local preview.
Hover at the bottom of Live · A− smaller · A+ larger · percentage shows the current size
The four Live Output buttons
From left to right: Theme Photo, Quick Bible, Standby and Power Off. The active action changes color so you can identify the current Live state. The same four controls always appear at the top of Live Output.
Theme Photo
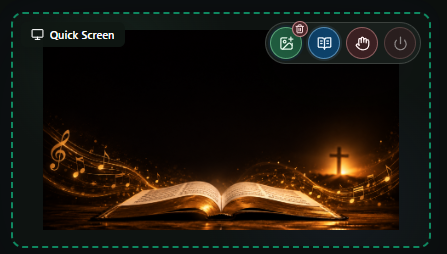
Press Theme Photo and choose the image for the service, congregation or event. When the theme is active, its button turns green and that image is shown in Live. The small trash icon then clears Theme Photo completely. Standby can cover the theme, but it does not delete it.
Green = Theme Photo active · Trash = remove the selected theme
Quick Bible
Press the blue Bible button to open Quick Send, type a passage and send it immediately. The complete Quick Bible flow and its screenshot are kept together in the Bible section above.
Quick BibleSecond button in Live Output
Standby
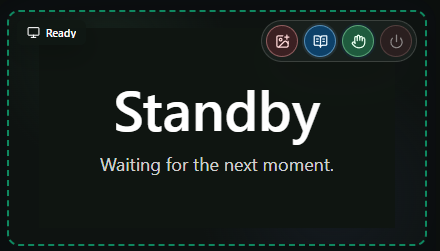
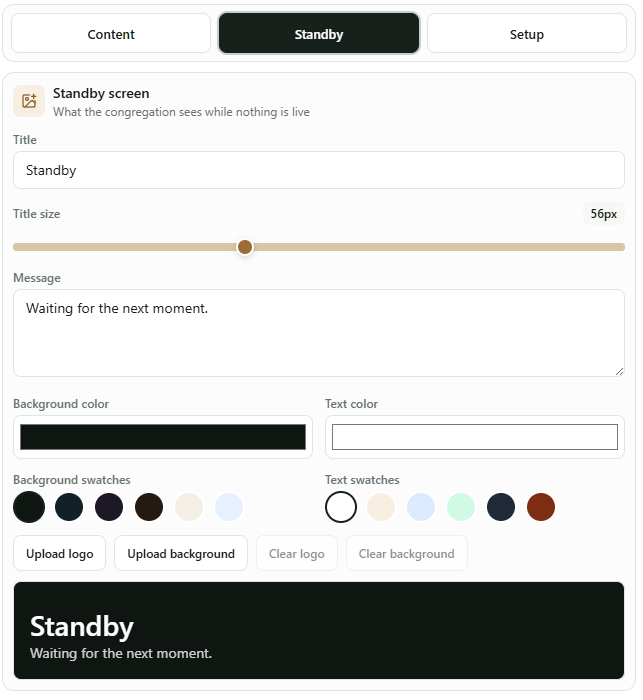
Standby temporarily replaces the current Live content with the congregation or event message; it does not remove an active Theme Photo. In Settings → Standby, set the title, message, logo or background image, background color and text color.
The green hand means Standby is active.Settings → Standby controls what the audience sees.
Power Off
Power Off stops SHINE from displaying content on the second screen. SHINE remains open and running, while the audience display returns to that computer’s desktop or background.
Stop SHINE output
06
Settings and visual customization
Adjust each content type without confusing it with the global output.
Set how each content type looks
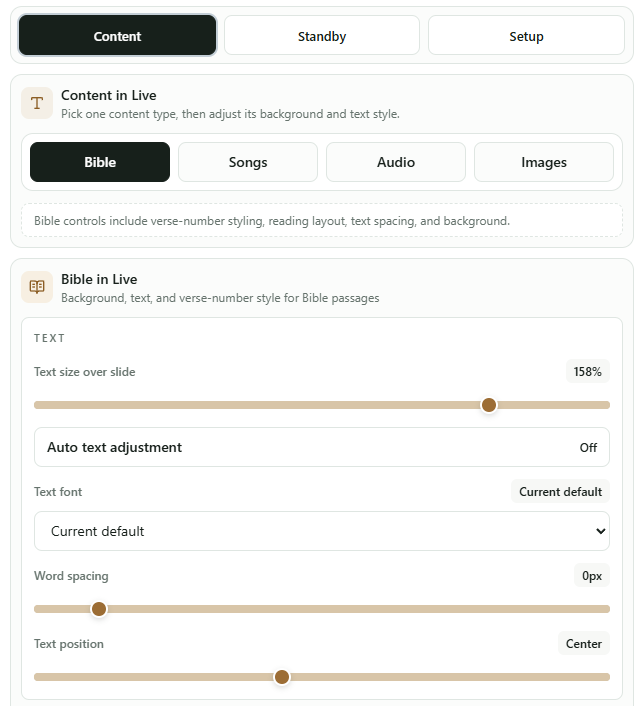
Go to Settings → Content, then choose Bible, Songs, Audio or Images. For Bible and song lyrics you can set text size, automatic text adjustment, font, word spacing, text position, colors and background. Choose Images to adjust how images are presented.
Use the Live bottom bar for an immediate on-air size change. Use Settings → Content for the detailed appearance of each content type.
Settings → Content → choose the content type, then adjust its appearance
Standby: choose what is shown between presentation moments.
Setup: configure screens, output routing and installation-level behavior.
Preview before sending. Changes made with the Live size bar are visible to the audience immediately.
07
Connection status and common checks
Know what Online, Offline and Needs attention mean before troubleshooting.
Online: the selected installation is currently reachable.
Offline: open SHINE on the computer and confirm internet access and the same linked account.
Needs attention: the channel exists but needs a secure reconnection; it is not the same as a healthy connection.
If content does not appear, confirm the correct installation, destination folder, output screen and active Live slot before sending again.
08
SHINE by Heaven Mobile App
Connect the phone, manage authorized people and send content to the desktop Library from anywhere.
Install the Mobile App or use your web account
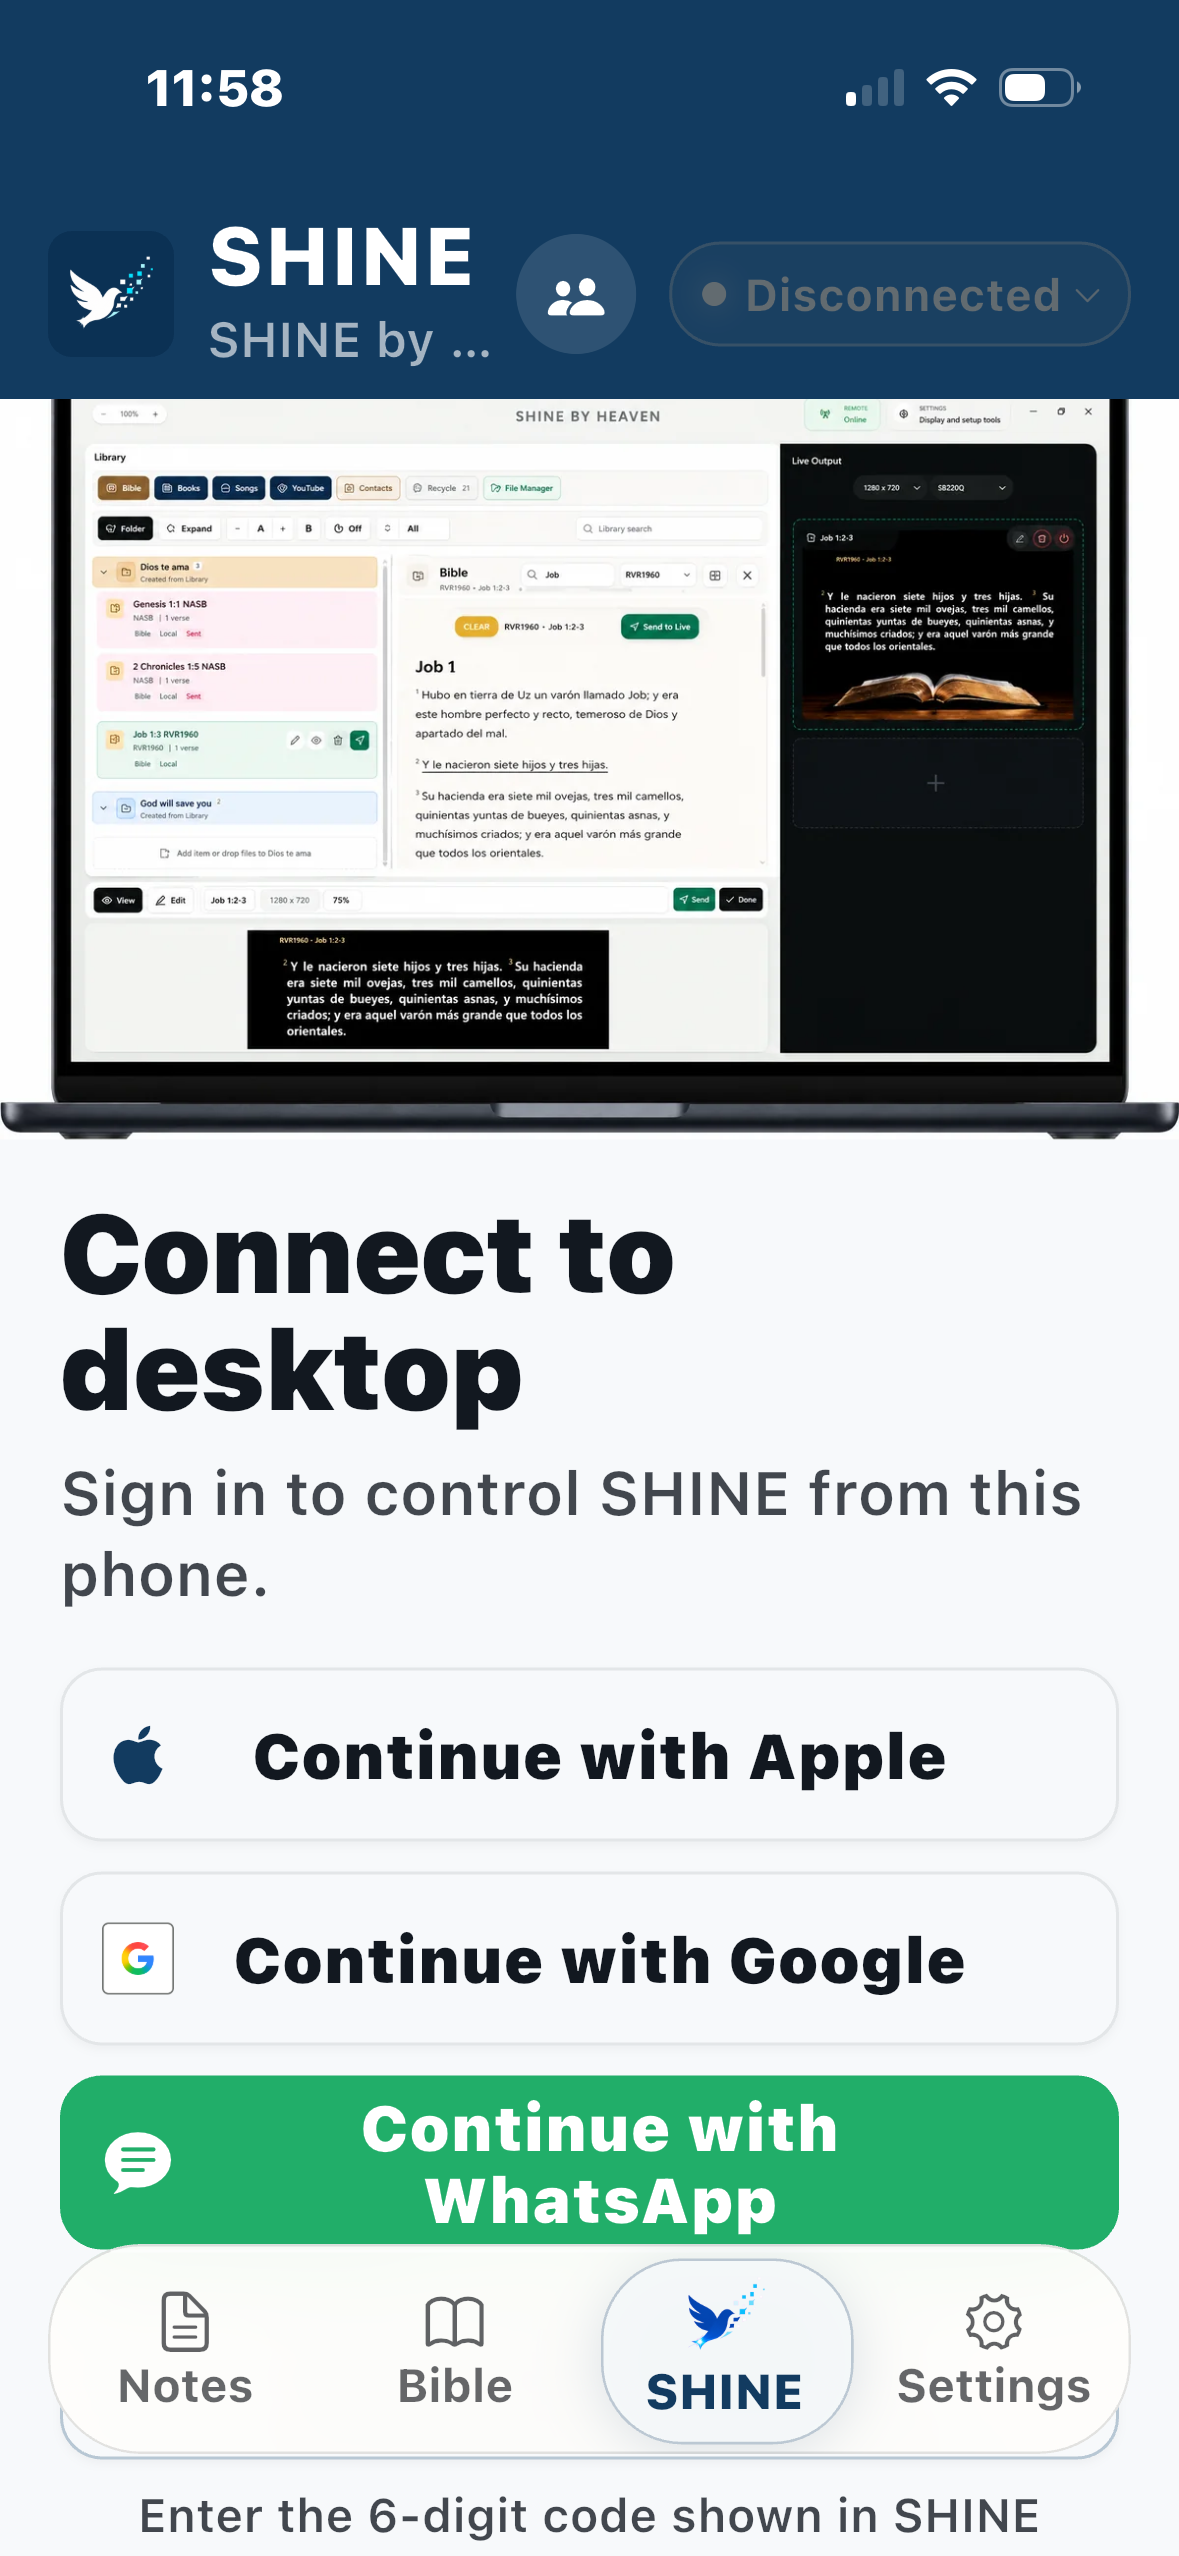
On iPhone or iPad, install SHINE by Heaven from Apple’s App Store. After installation, open the app to register, sign in and connect it to the desktop.
You can also sign in at shinebyheaven.app and open your account Library in the browser. This gives you access to the live Library even when the Mobile App is not installed on that device.
Register first with Apple or Google. If you already registered, sign in with the same Apple or Google account and your organization information and saved connection become available automatically.
You can also connect directly from the desktop program. Open SHINE Center; after that installation is registered, choose the Mobile App connection and SHINE displays the six-digit code to enter on the phone.
SHINE CENTERConnections
Use the same registered account or enter the six-digit code shown by SHINE Center.
Manage administrators and users
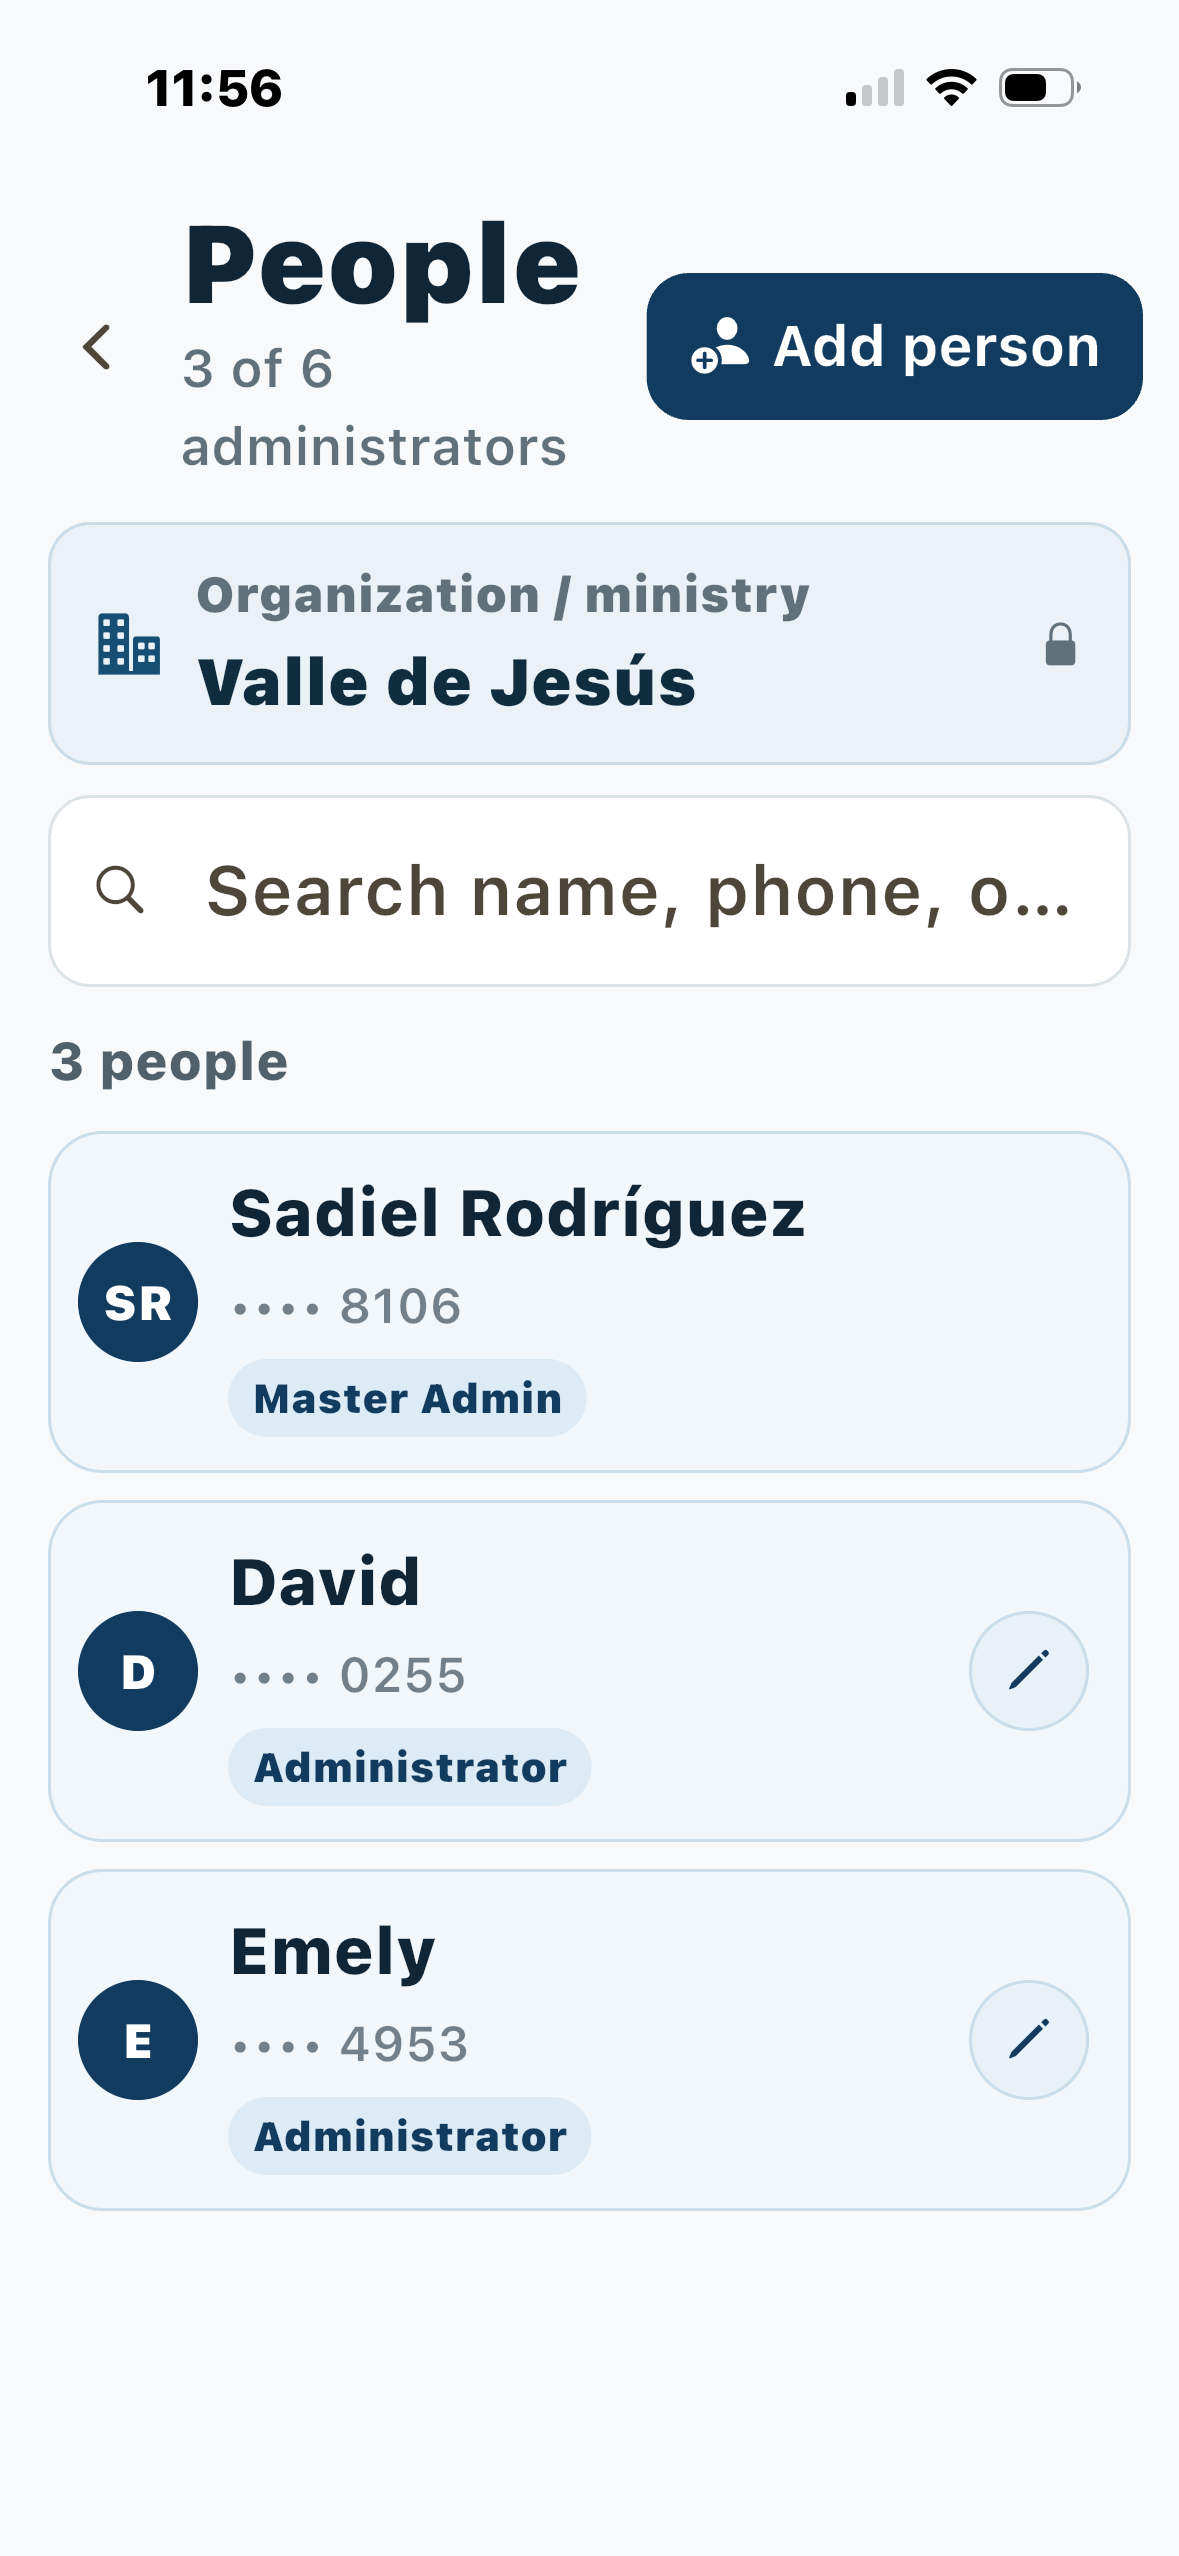
The People area shows the organization or ministry, its Master Admin and its administrators. Add or edit authorized people here. Authorized users can access the controls for the linked SHINE installation according to their assigned role.
People → review the organization and manage who is authorized to control SHINE.
The mobile Library reflects the desktop
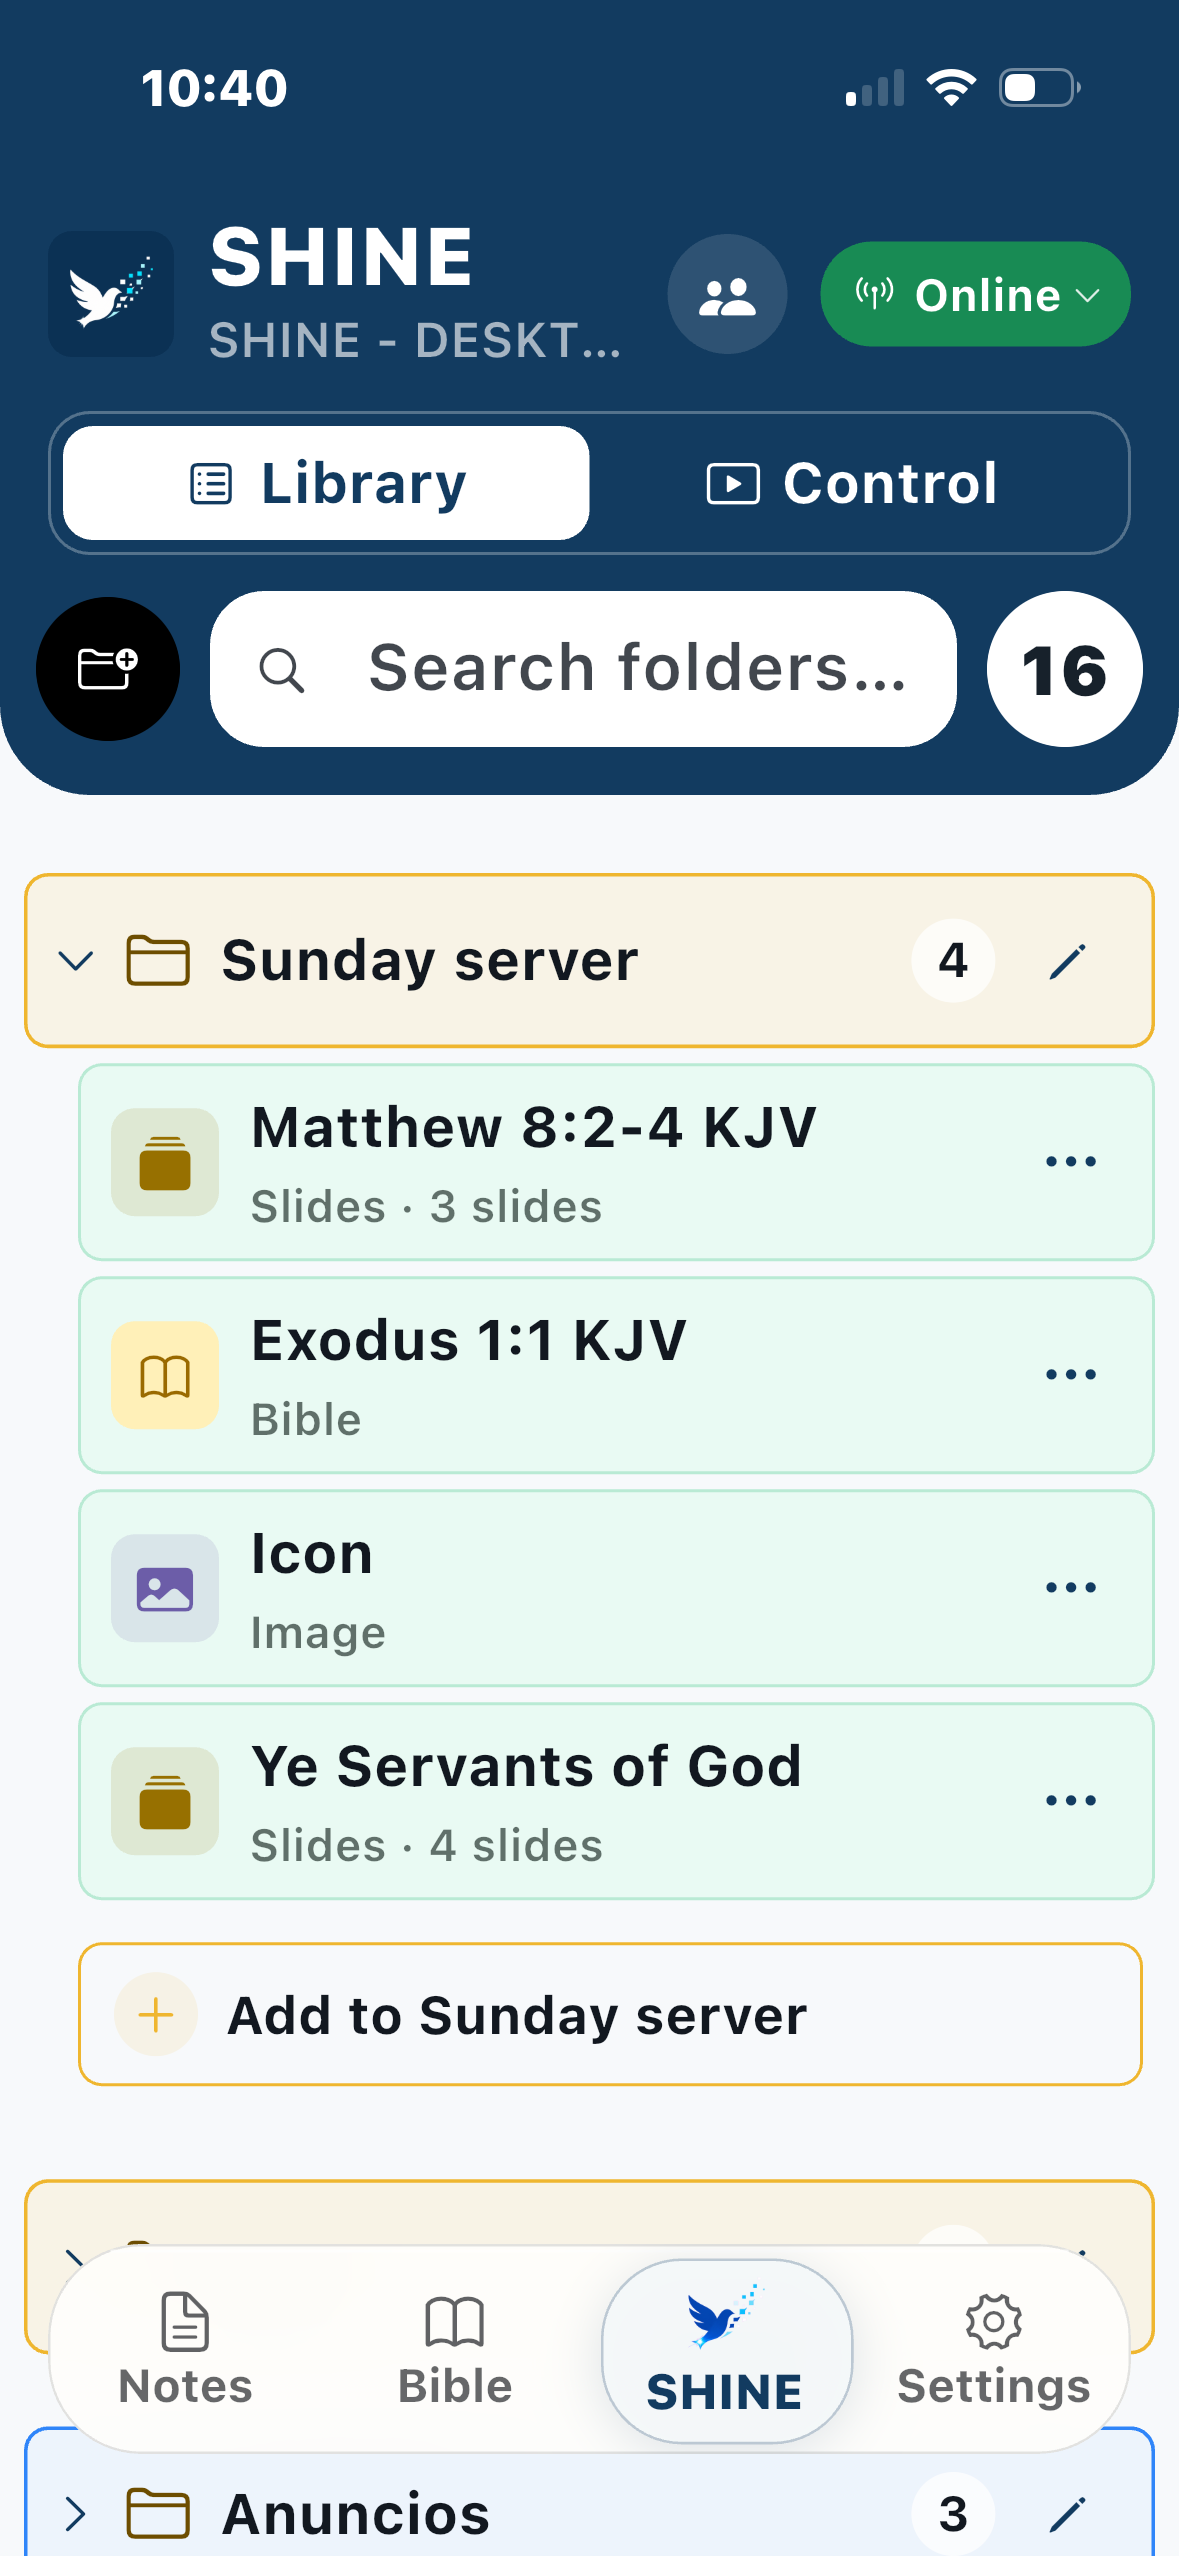
The app Library reflects the folders and content available in the connected desktop Library. Search folders, open their contents and work with Bible passages, slides, images and the songs already available in the desktop Songs library.
Library mirrors the connected desktop organization and keeps its folder structure recognizable.
Add content to a folder
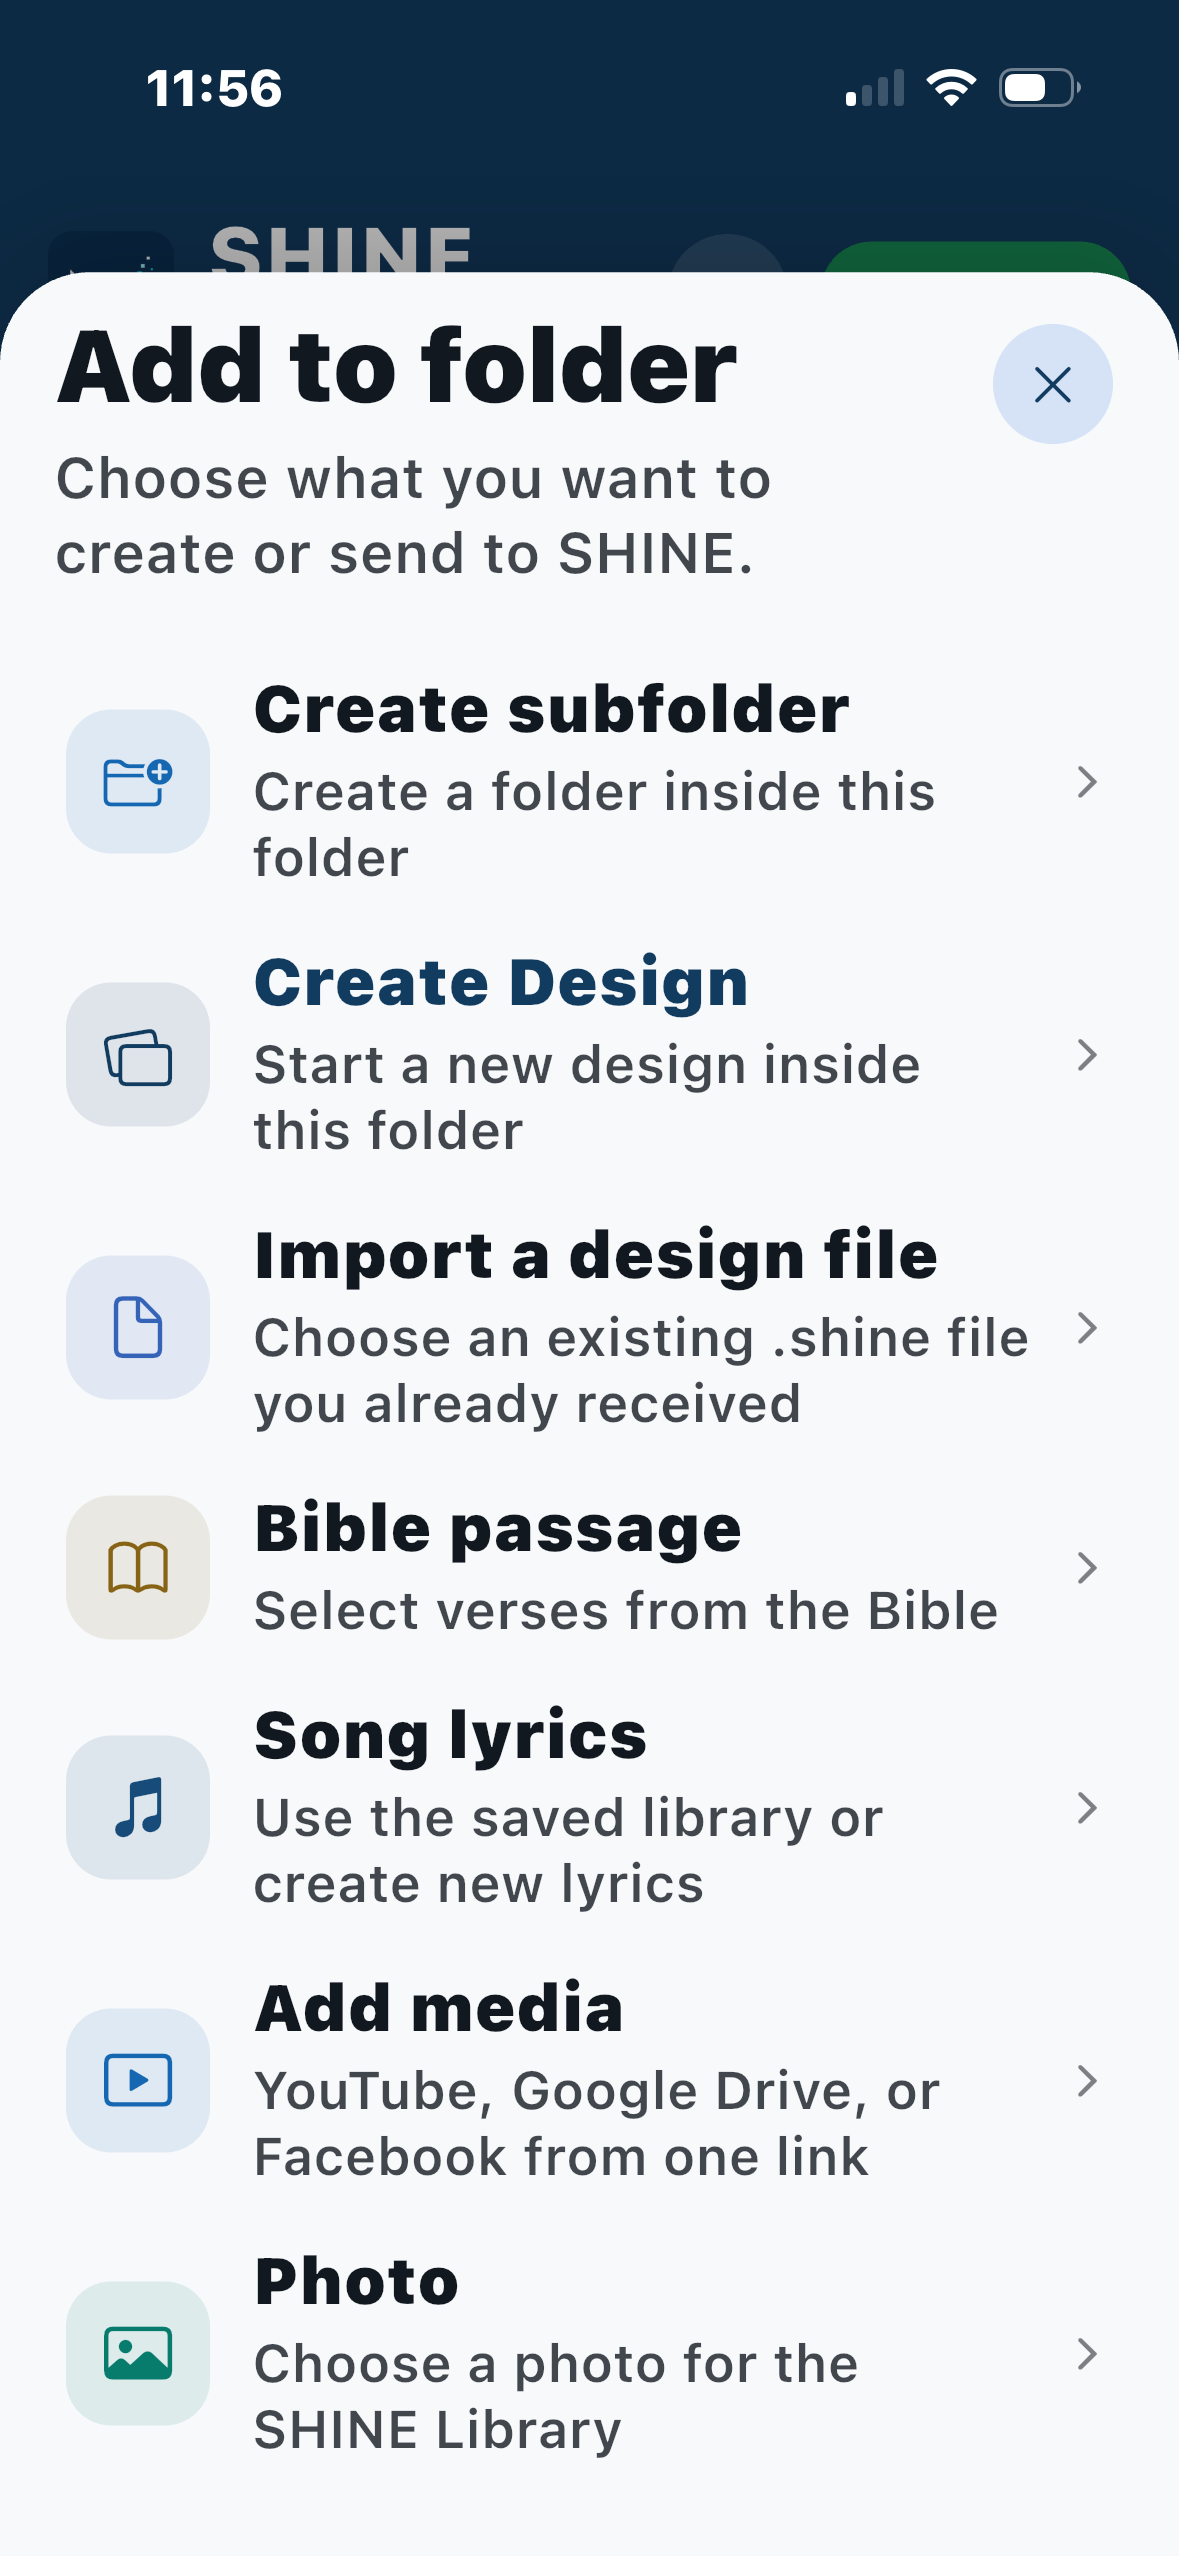
Tap Add to folder to create a subfolder, create or import a SHINE design, choose a Bible passage, use saved song lyrics or create new lyrics, and add a photo from the phone.
Media links from YouTube, Google Drive or Facebook remain available in Library for streaming; SHINE does not download those videos to the Library.
Add only the content needed for this folder; every option opens its own focused flow.
Add Bible verses to SHINE
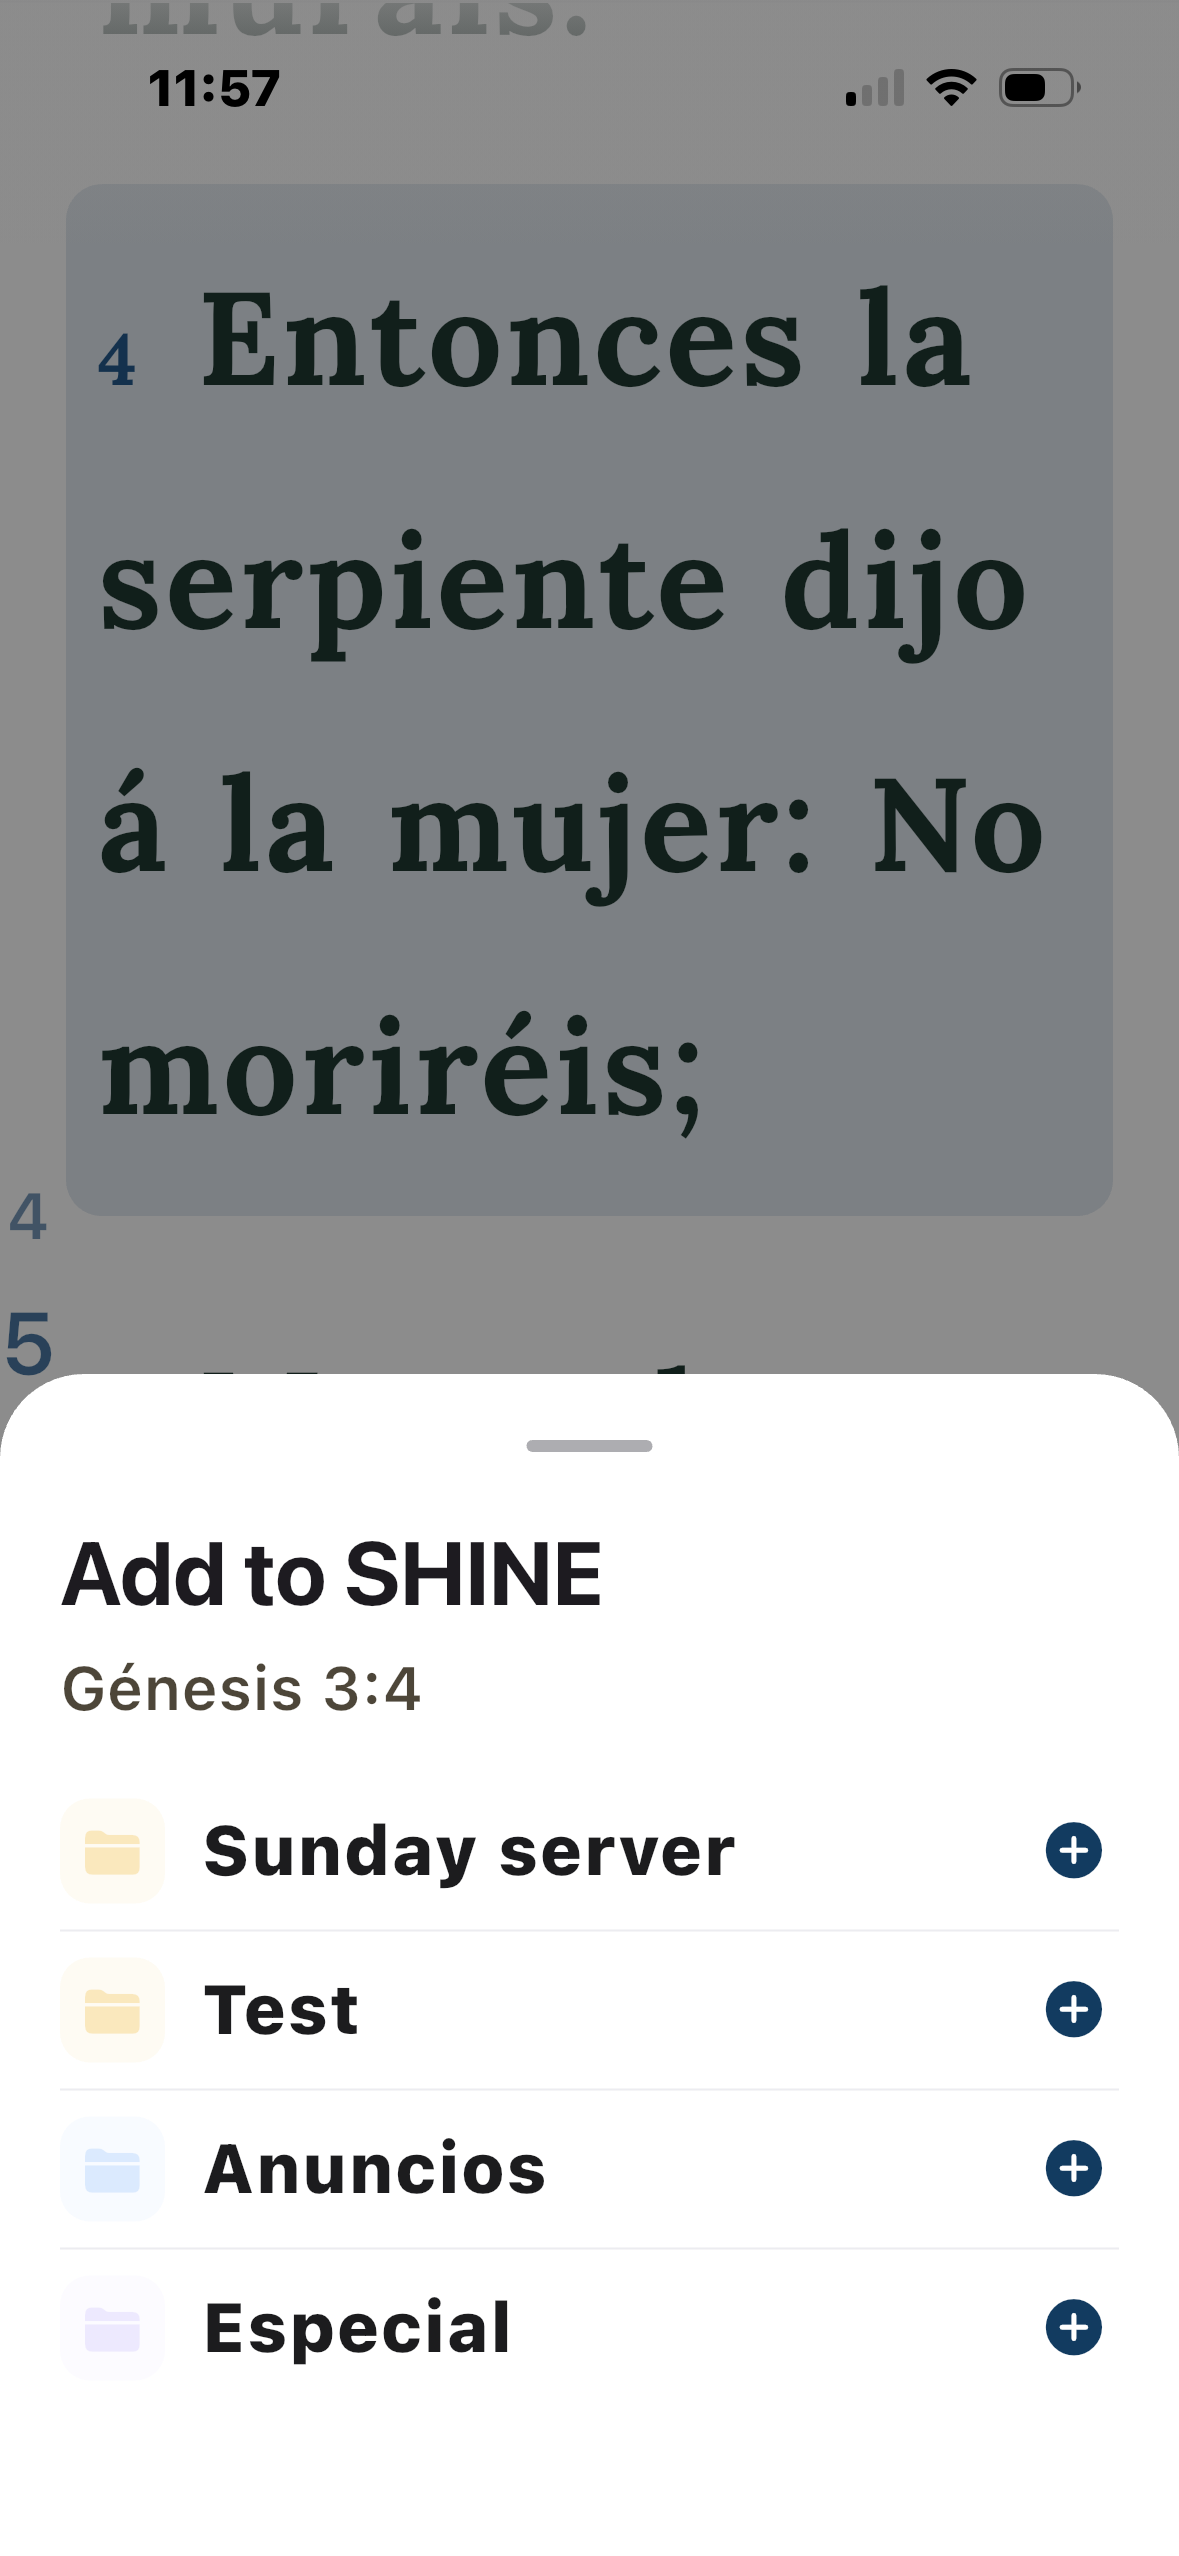
From a folder, choose Add → Bible passage. Or open Bible, find one verse or select several verses, then use Add to SHINE and choose the destination folder.
The request travels through SHINE’s servers to the connected desktop. The phone and desktop can be in different homes or countries; both only need internet access, the authorized account and an Online connection.
Select the destination folder and press + to send the passage to the desktop Library.
Keep the desktop ready for remote access
In the desktop program, go to Settings → Setup. If the team needs to reach SHINE from home or another location, turn on Start SHINE when this computer starts and Keep SHINE running in the system tray. Together they reopen SHINE with the computer and keep Remote responsive after the main window is closed.
When the connection is healthy, SHINE Remote says Online and SHINE Center is green. Open SHINE Center to see that the installation is connected to the Mobile App.
Start SHINE when this computer startsOpen SHINE automatically when you sign in.
Keep SHINE running in the system trayKeep SHINE Mobile responsive after closing the window.
SHINE CENTERSHINE Remote · Online
Connected serviceSHINE by Heaven Mobile AppAuthorized · Online
Remote means remote: once authorized and Online, the phone or web account can send content to the connected desktop from anywhere with internet access.
HELP AND FEEDBACK
Questions or found a bug?
In SHINE by Heaven Software or the Mobile App, open Settings → Report an issue. Use that official channel to send bug reports, questions or other feedback directly to our team.